Drill Torque Settings Chart
Drill Torque Settings Chart - Web setting 1 is low speed/high torque and is best for driving screws. Set the clutch to the desired torque level. This may seem like common knowledge, but i hope it's helpful to some. The correct torque setting depends on the size and type of the screw or bolt you are using. We’ll also give you some information on a great cordless drill with the highest torque capacity. In addition to that, though, there's a secondary application. The clutch settings are typically marked on the drill itself, and each number corresponds to a specific torque setting. Our example drill has two gears, so there are two speed ranges. Web determine the torque is not difficult. Hammer rate (or blow rate): Web how to use the torque settings on a drill: Remember to start with a low torque setting and gradually increase it as needed to avoid damaging the material or. When your wireless drill will produce the maximum volume, you will see a certain number with “hm”. Web how can i determine the correct torque setting for my drill? Set the clutch to the desired torque level. Web generally speaking, most drills will have between 3 and 15 newton meters of torque. Web torque settings on a cordless drill determine the amount of force that the drill will exert when driving a screw or drilling a hole. Understanding torque is crucial to achieving precision when working with materials of different densities. Web here's the basic rundown of what the torque and speed settings mean on a cordless drill. Web here’s how to use the clutch settings to adjust the torque on your drill: Web the torque rating is a standardized test that measures how much torque the drill produces in a very brief moment while it’s locked down. Web cordless drill torque settings. Our example drill has two gears, so there are two speed ranges. It’s important to use the correct torque setting to avoid damaging the material you are working with or. Setting 2 is a medium speed/torque and can be used for drilling or driving. Web cordless drill torque settings. Web determine the torque is not difficult. What is a good torque for cordless drill? The correct torque setting depends on the size and type of the screw or bolt you are using. The clutch settings are typically marked on the drill itself, and each number corresponds to a specific torque setting. Setting 2 is a medium speed/torque and can be used for drilling or driving. Web we’ll explain how to adjust the torque or clutch settings on a drill and what the hammer settings on a cordless drill do. Web setting 1. Web the torque rating is a standardized test that measures how much torque the drill produces in a very brief moment while it’s locked down. Setting 2 is a medium speed/torque and can be used for drilling or driving. Web setting 1 is low speed/high torque and is best for driving screws. There is also the adjustable mode system that. When your wireless drill will produce the maximum volume, you will see a certain number with “hm”. The numbers are designed with a rotational clutch. Web torque settings on a cordless drill determine the amount of force that the drill will exert when driving a screw or drilling a hole. Web to use torque settings on your cordless drill, simply. Web drill/driver clutch settings torque chart? Web the makita drill torque settings chart is a valuable tool that can help you achieve the best results when using your makita drill. Web setting 1 is low speed/high torque and is best for driving screws. Web we’ll explain how to adjust the torque or clutch settings on a drill and what the. Now, to attain maximum torque you have to understand the numbers and symbols on the drill and what they mean. This is because higher torque levels make it easier to drill through tougher materials. Web cordless drill torque settings. In addition to that, though, there's a secondary application. Web in position 1 the drill will spin more slowly and have. Remember to start with a low torque setting and gradually increase it as needed to avoid damaging the material or. This comprehensive guide will delve into every aspect of the drill torque settings chart, helping you understand its significance, interpret its data, and leverage it to enhance your drilling endeavors. The numbers are designed with a rotational clutch. Set the. Our example drill has two gears, so there are two speed ranges. That is, if the number is high, it means that the torque is also high at the moment. By using the chart to select the appropriate torque setting for your application, you can prevent damage to the screw, the drill, or the workpiece. Web setting 1 is low. Learn how different torque settings affect drilling performance, and gain valuable tips for maximizing efficiency and accuracy in your work. Web determine the torque is not difficult. It’s important to use the correct torque setting to avoid damaging the material you are working with or stripping screws. That is, if the number is high, it means that the torque is. Set the clutch to the desired torque level. By using the chart to select the appropriate torque setting for your application, you can prevent damage to the screw, the drill, or the workpiece. In addition to that, though, there's a secondary application. Web generally speaking, most drills will have between 3 and 15 newton meters of torque. Now, to attain maximum torque you have to understand the numbers and symbols on the drill and what they mean. Learn how different torque settings affect drilling performance, and gain valuable tips for maximizing efficiency and accuracy in your work. In position 2 will spin faster but with less torque so better for drilling holes. Web how to use the torque settings on a drill: Web here's the basic rundown of what the torque and speed settings mean on a cordless drill. The process of using a clutch on a drill is a pretty simple one and since there is no preset specifications for the amount for each number provides and since every manufacture and every model of drill will be different, the process is pretty general and will work for nearly every drill. We’ll also give you some information on a great cordless drill with the highest torque capacity. Web cordless drill torque settings. This comprehensive guide will delve into every aspect of the drill torque settings chart, helping you understand its significance, interpret its data, and leverage it to enhance your drilling endeavors. This clutch rotates and helps you adjust the drill torque on your cordless drill. Our example drill has two gears, so there are two speed ranges. Remember to start with a low torque setting and gradually increase it as needed to avoid damaging the material or.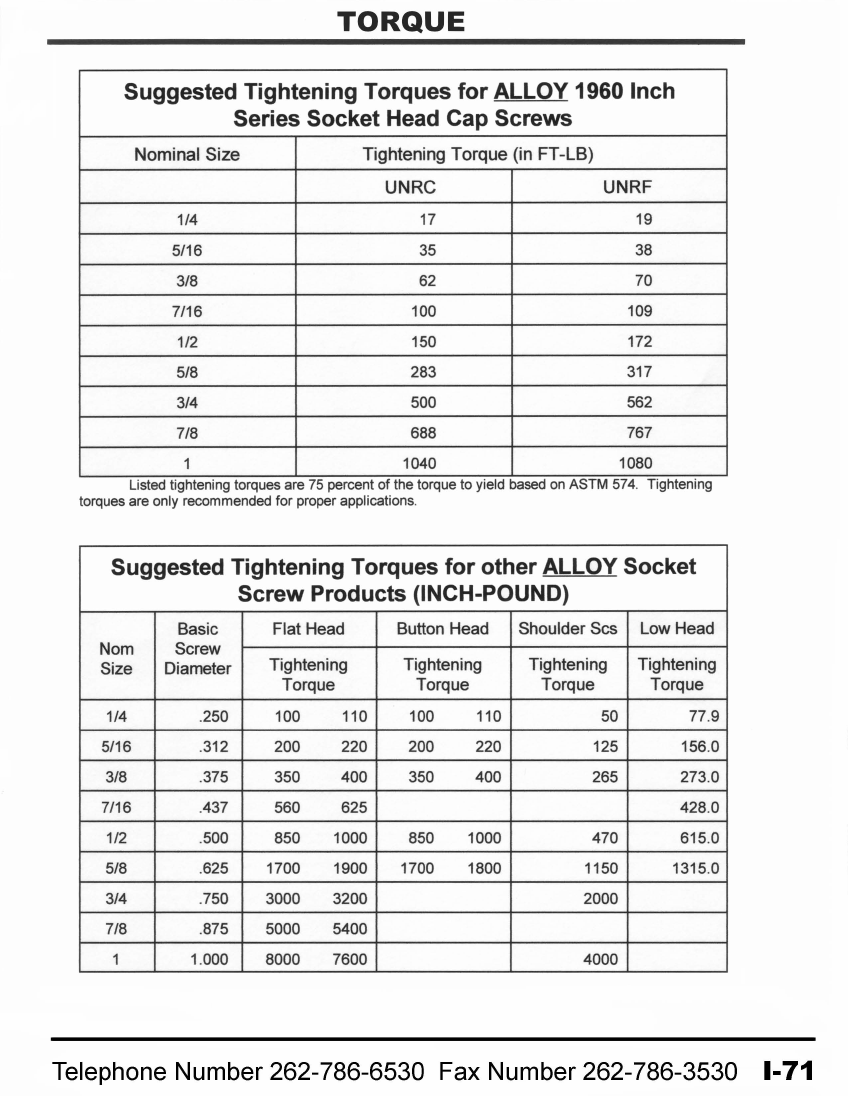
Torque Conversion Chart Printable

Drill Torque Settings Chart

What Do The Numbers On a Drill Mean? Let's Torque About It
![Cordless Drill Torque Chart With [High Torque Drills 2024]](https://toolminer.com/wp-content/uploads/2021/04/Research-Part-1-768x1126.jpg)
Cordless Drill Torque Chart With [High Torque Drills 2024]

Drill Pipe Torque Chart
Dewalt Drill Torque Settings Chart Expert Best Guides
![Cordless Drill Torque Chart With [High Torque Drills 2024]](https://toolminer.com/wp-content/uploads/2020/03/Cordless-Drill-Torque-Chart-1536x1024.png)
Cordless Drill Torque Chart With [High Torque Drills 2024]
![Cordless Drill Torque Chart With [High Torque Drills 2021]](https://toolminer.com/wp-content/uploads/2021/04/Research-Part-3-1111x1536.jpg)
Cordless Drill Torque Chart With [High Torque Drills 2021]

What Do The Numbers On a Drill Mean? Let's Torque About It

Torque wrench settings chart
This Is Because Higher Torque Levels Make It Easier To Drill Through Tougher Materials.
Web Torque Settings Are An Essential Feature On Cordless Drills That Dictate The Amount Of Force Used To Tighten Screws Or Drill Holes.
Check The Manufacturer’s Instructions Or Use A Torque Chart To Determine The Appropriate Setting.
There Is Also The Adjustable Mode System That Comes With 3 Gears.
Related Post: